 Sean Clark

With downloadable data comprising just a fraction of the information available online, learning how to use web extraction--or scraping--software has been on my to-do list for some time.
A sophisticated person would take the time to learn a python package like Beautiful Soup or Scrapy. I thought about wandering down that path, but stumbled across a more user-friendly alternative. ParseHub is an intuitive, graphics-based web scraper that allows you to pull in significant amounts of data with very little preparatory learning. I spent a bit of time over the Christmas holidays playing around with it, and collected a few of the main lessons below.
ParseHub
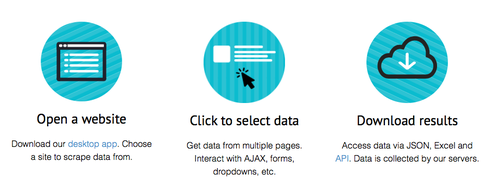
Based in Toronto (the giveaway is a reference to the NBL basketball league on the product's--very helpful--support pages), ParseHub's main product is a scraper app you download onto your desktop. Various pricing levels are offered, but if you're willing to cap out at 200 pages and make your data public, you can register a free account.
The basic idea of the app is to plug in a website, make connections between the headings, tables, and hyperlinks you want collected, and then let it do its magic. Once the extractor has run you can download the data into .csv format, making it ready for export to wherever you need it to go next.
Scraping Live Data
The subject to my experiment was Sports Reference.com's excellent (though presumably soon-to-be-extinct) Olympics database. I wanted to take a look at the fatigue and average pace curves for swimming at the Rio Olympics (a post on this will follow...), and this tool was the excuse I needed to dig into the data.
My technical objectives here were to be able to scrape tables, as well as to execute hyperlinks to subsidiary pages. Here is a brief overview on how to get there, in case you have a similar project in mind.
1. Load up your webpage of interest.
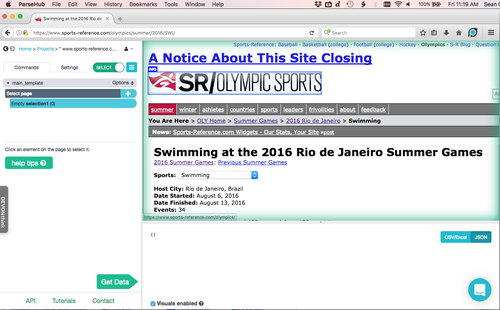
For me the splash page of interest was the Rio 2016 swimming home page on the Sports Reference site. It contained the root links to all the data I was interested in.
Provide your target url when prompted after starting a new project (you can also dump a new one into the 'settings' tab, if you later want to change it). Once the page loads inside ParseHub, you can maneuver around and explore the target site, without committing to any scraping, by toggling the green 'select' button on the top left.
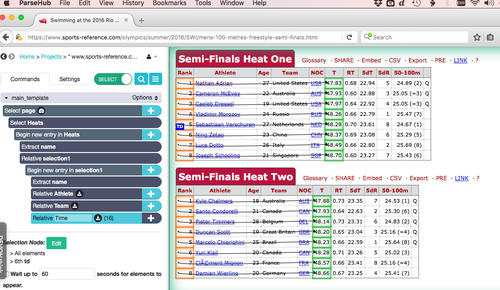
Your ParseHub command screen will look something like this:
2. Select the elements you're interested in.
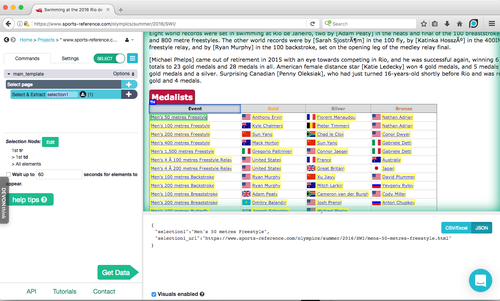
With your page loaded the next step is to select the 'elements' you are interested in. This includes any data points, hyperlinks you want clicked through, and the headings of any tables you want scraped.
You add an element to scrape by pressing on the '+' button in the command panel, then choosing the 'select' option that pops up and clicking on the desired element on the web browser panel. Potential element targets are highlighted in blue; selected elements are highlighted in green.
As you click on the desired elements, the program will highlight in yellow its suggestions for similar elements. ParseHub's ability to learn connected elements is strong: click the first few names in a column and it will quickly select everything else all he way down to the bottom.
3. Connect table headings to row headings
With your tables selected (by clicking on their headings), you need to establish a relational connection to their contents. Using the '+' button again, choose the 'Relative Select' option and tie the heading to each ROW heading. (Think of the row as the master ID, rather than the column heading. Data is tied horizontally, rather than vertically).

There's no need to select column headings, given you will be labelling each element manually. (In the case here, we will call element #1 'Rank', element #2 'Athlete', etc).
4. Connect the row headings to each variable you want.
With the table heading connected to each row heading, the next job is to make 'Relative Select' connections to each variable column you want scraped. You will need to make the connection for the first couple of row headers (in this case, Rank #1, #2, and maybe #3), but after a few the AI will kick in and recognize that the two columns are connected in their entirety.
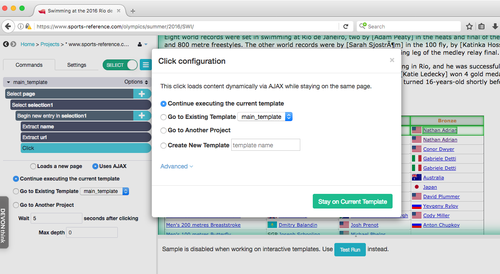
5. Establish any hyperlinks to click through.
Sometimes the data you want is behind a hyperlink. In that case you'll need to use the 'click' option of the '+' button.
This command is straightforward: whatever hyperlink you select, the program will click on it after its finished with the current page. The main concern is how you want it to treat the new page of data. Your choices are either to have it scrape the new page according to your current set of rules (or 'template'), or to create a new set of rules for the fresh page ('create a new template'). If the latter is chosen, you simply build scrape instructions in the same way as described above.
6. Run the program
Once you've built the scraping model to your specifications, click the 'get data' button on the bottom left of the main command screen. It will give you the option to test the model for a few pages, which is a good way to debug before a massive scrape (though this isn't too necessary if you're doing a small project like mine).
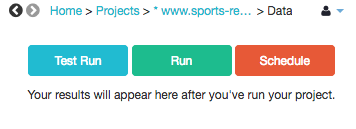
The 'Run' button will set the scraper in motion. Don't be concerned if it queues up for a while; even a relatively simple scrape can take a few minutes.
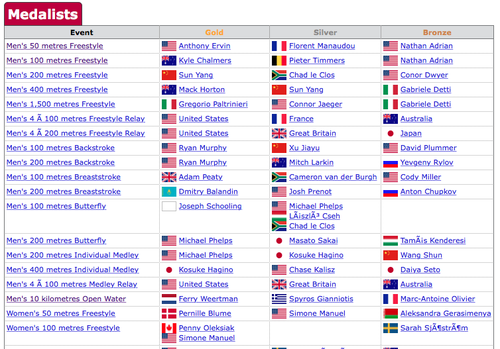
When the results are finished you can download the results, with my preference being for .csv. The final result, after you export it an editor (here I've used Numbers) looks something like this:

Follow-up
There's a few ParseHub capabilities that sound interesting, but I haven't tried out yet:
- Scrape map data.
- Pagination (using 'click-on-next' buttons--or not)
- Entering a list of URLs to crawl.
Further Resources
ParseHub's 'Getting Started' page is available here.
A look specifically at scraping tables is here. A related example of scraping Bloomberg data is here.
A sports data scraping example is here.
Happy scraping everyone!

Write a comment